

Learn how to wish Merry Christmas using Python Turtle Program
This Christmas, why not send a card that is both festive and fun. show your friends and family how much you love them with an animated card


Hello there,
In this blog, I will be attempting to explain something fun in python. I am no expert but I thought this package is quite a fun thing to play with when you are bored. When you downloaded the latest Python package, you can use it to create unique graphics as if you are drawing something on a drawing board.
What is the Python Package Name - It's Turtle. Turtle Graphics.

Christmas is here and this moment makes it a great time to write a festive tutorial to help you learn Python. In this tutorial, you will learn how to draw a simple Christmas Tree using Python's turtle module. We are going to do this in an efficient way, using some of Python's tools to avoid having to repeat ourselves.
Here is the full script for better understanding:
from turtle import *
import random

# Width and Height of Tree Object
n = 170
speed("fastest")
left(90)
forward(3*n)
# Celebration Card setup
card=Screen()
card.setup(1.0,1.0,0,0)
card.title("Christmas Celebration!")
colors=['#92b6f0','#d95d78','#5cdbb5','#5ccde0','#e0d758','#ed9277']
card.bgcolor(random.choice(colors))

# Tree color
color("dark green")
# Draw backward desgin cordinates
backward(n*4.8)
# Turn turtle animation on/off and set delay for update drawings
tracer(8,50)

# Drawing Santa Hat
def drawHat():
    pen.color('red')
    pen.fillcolor('red')
    pen.begin_fill()
    for i in range(3):
        pen.fd(50)
        pen.right(120)
    pen.end_fill()
    for i in range(6):
        pen.dot(10,'white')
        pen.fd(10)
    pen.right(130)
    pen.fd(55)
    pen.dot(10,'white')

# Draw Christmas Tree
def tree(d, s):
    if d <= 0:
        return
    forward(s)
    tree(d-1, s*.8)
    right(120)
    tree(d-3, s*.5)
    right(120)
    tree(d-3, s*.5)
    right(120)
    backward(s)

# Draw Snow before Christmas Tree
def makeSnow():
    for i in range(50):
        snow=Turtle()
        snow.pu()
        snow.color("white")
        snow.shape("circle")
        snow.speed(0)
        snow.goto(random.randint(-700,700),random.randint(-700,700))
        snow.dot(7,'white')
        snowlist.append(snow)

# Snowfall after Christmas tree completion
def snowfall():
    for i in snowlist:
        i.goto(random.randint(-700,700),random.randint(-700,700))
        i.dot(7,'white')

# Calling makeSnow funtion
snowlist=[]
makeSnow()
tree(15, n)
card.tracer(False)
card.tracer(True)

# Draw Merry Christmas heading
pen=Turtle()
pen.hideturtle()
pen.color("black")
pen.pu()
pen.setx(-500)
pen.color('Yellow')
pen.write("Merry\nChristmas!!",font=("phosphate",40,"italic"),align="left")
pen.setheading(-90)
pen.fd(100)
pen.write("TO ALL OF YOU",font=("phosphate",30,"bold"),align="left")

# Calling Draw hat funtion
pen.setheading(0)
pen.fd(360)
pen.left(145)
pen.fd(40)
drawHat()

while True:
    snowfall()
    card.bgcolor(random.choice(colors))

backward(n/2)
bye()
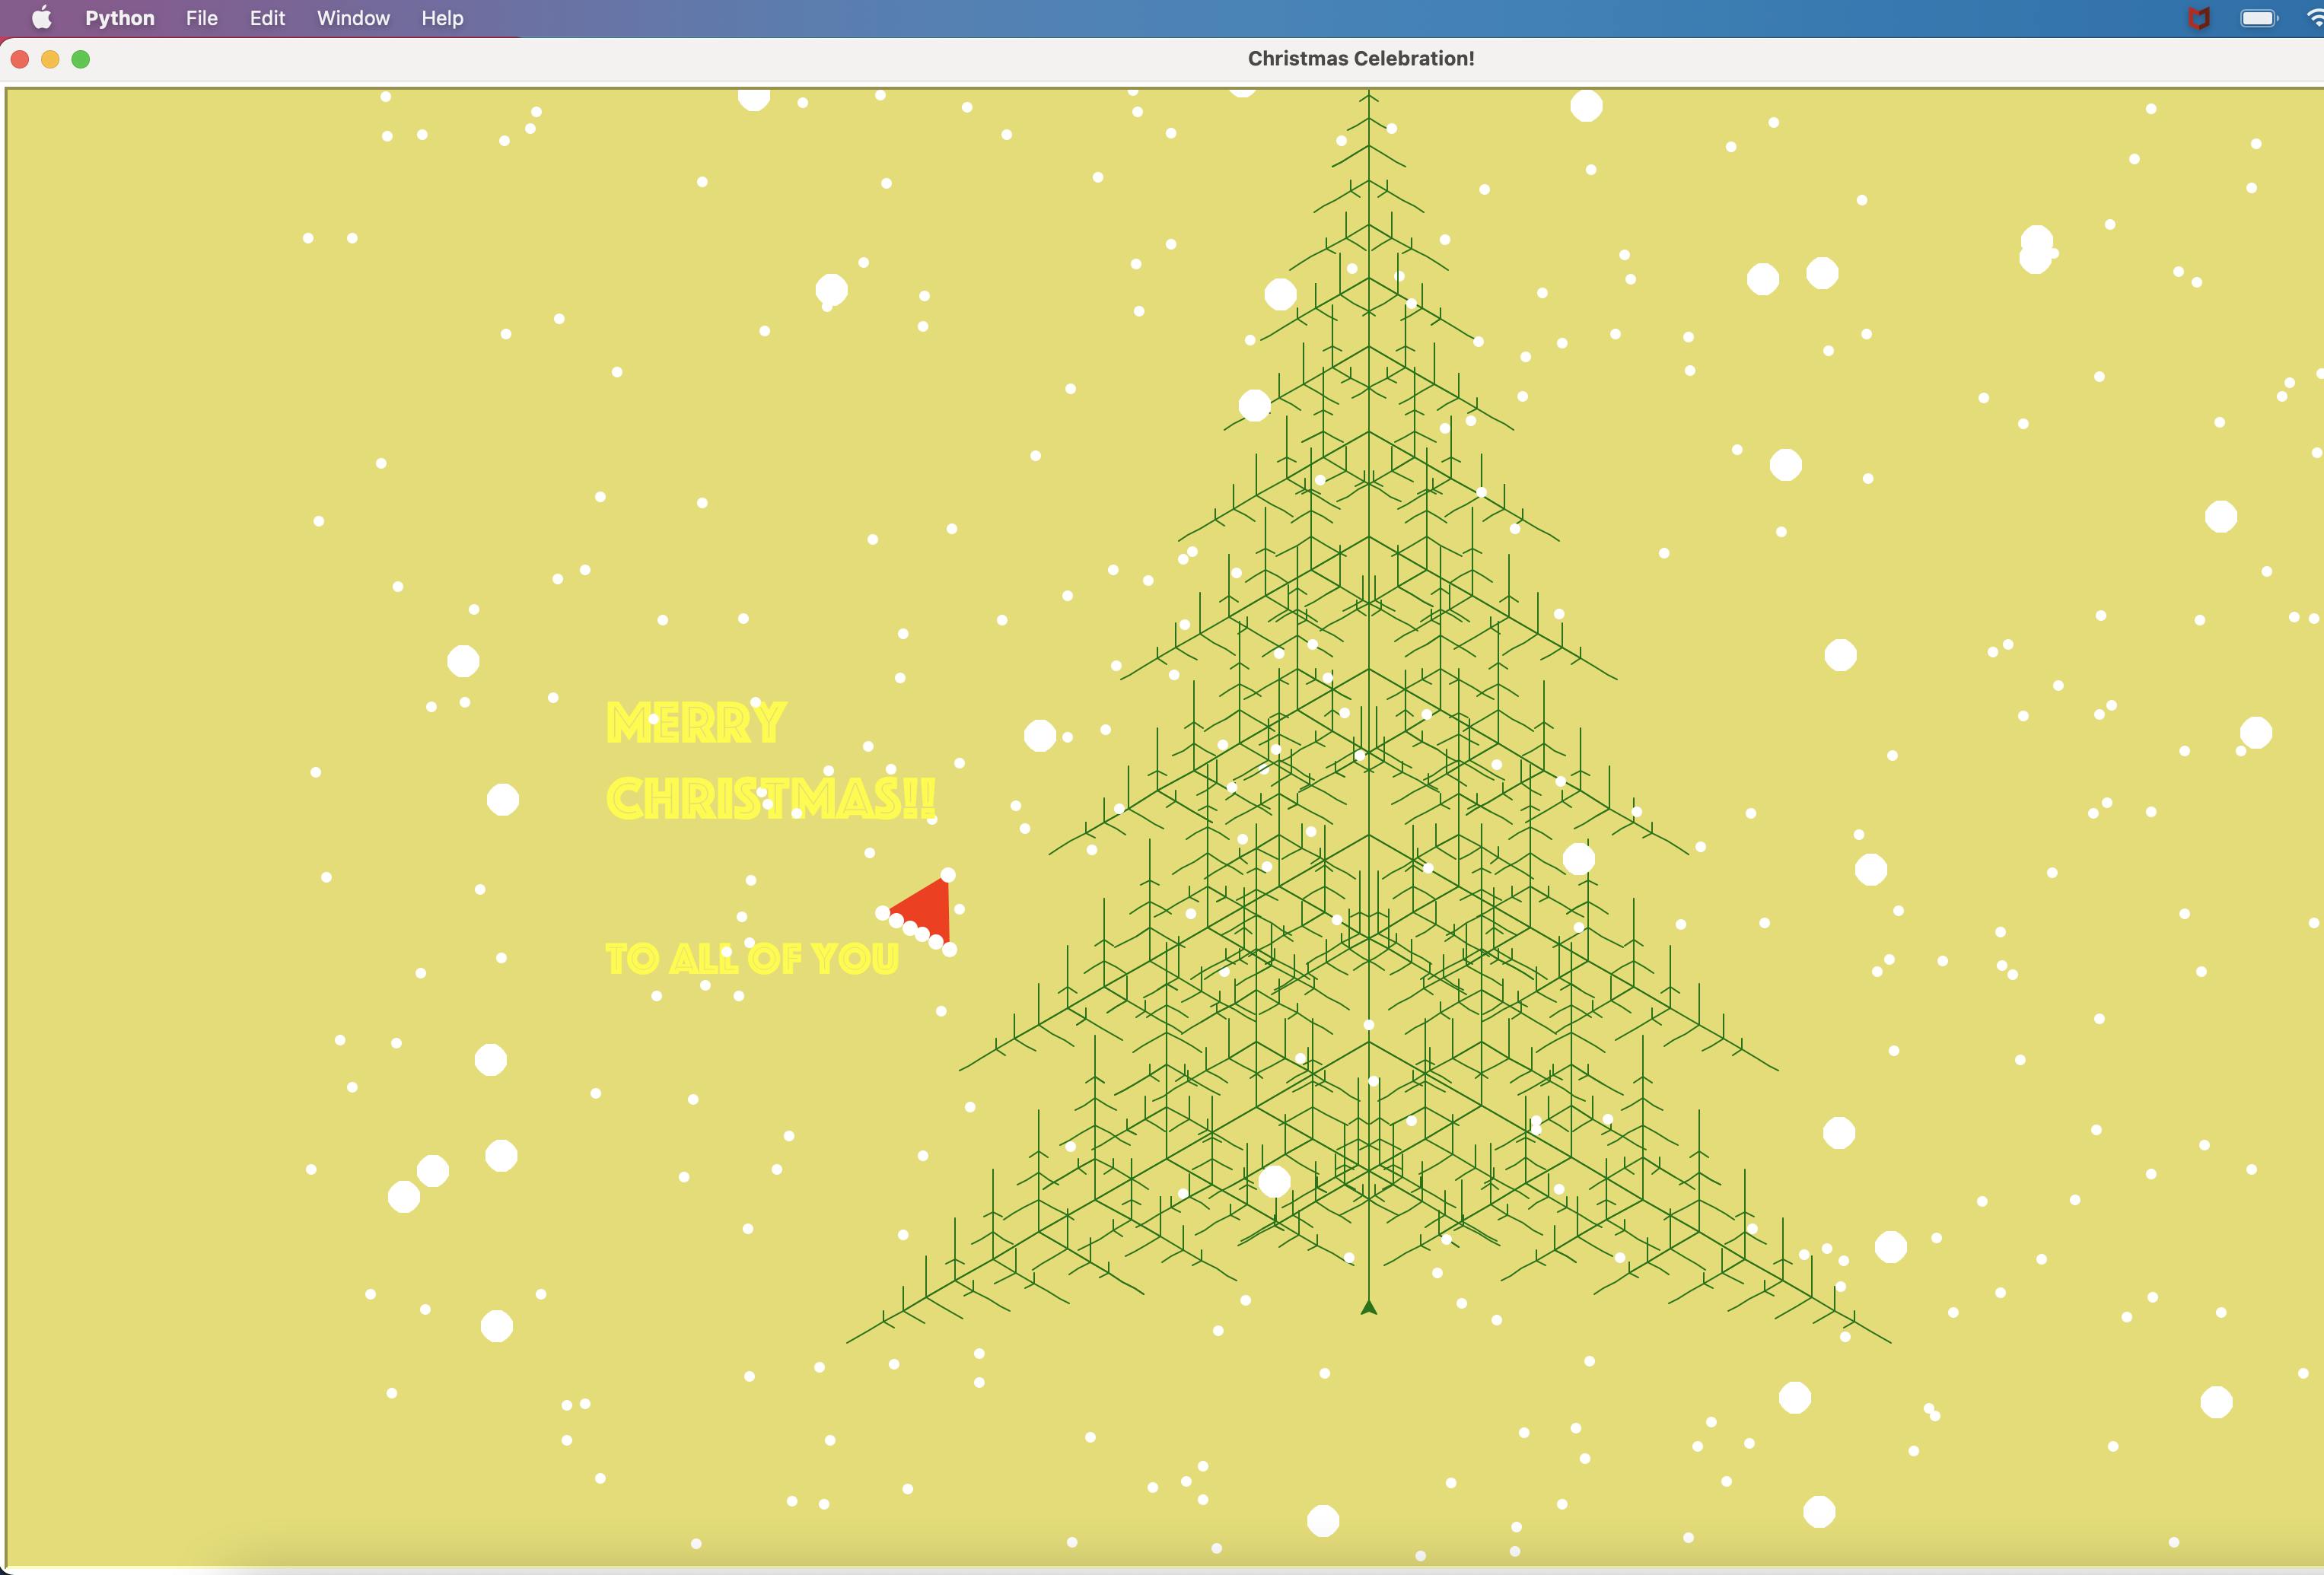
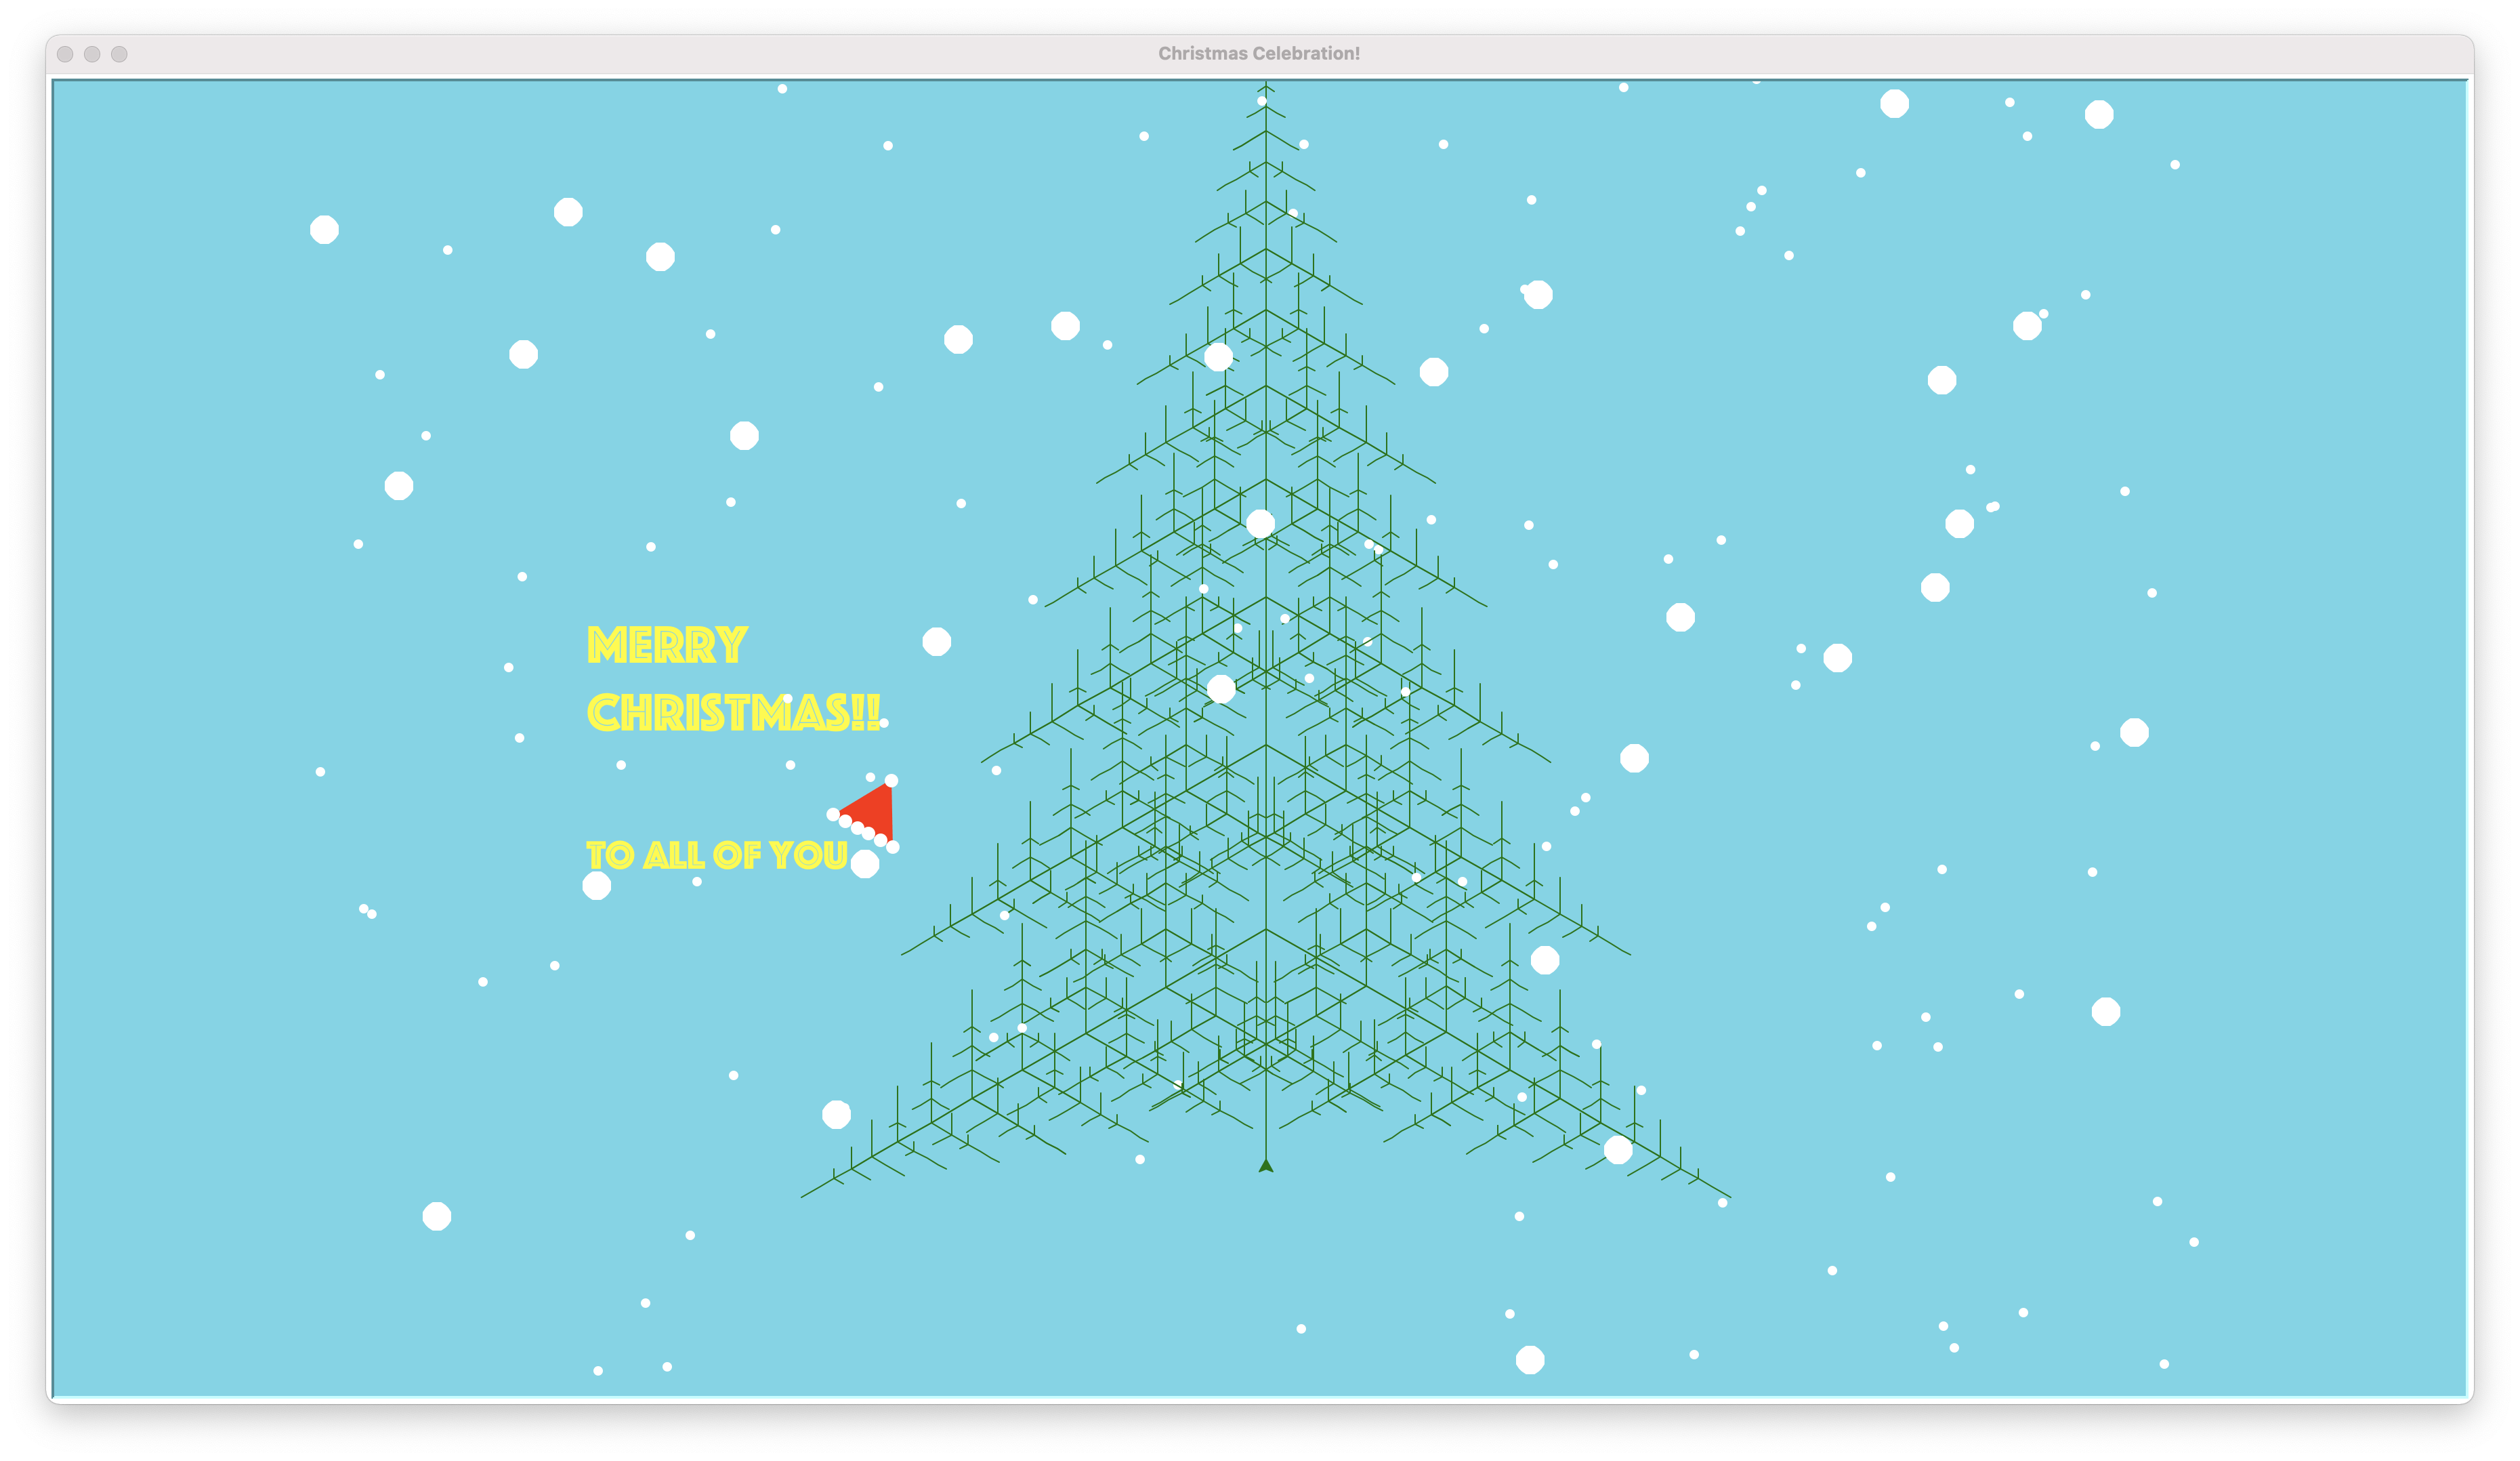
Here’s how the Animated Christmas Tree looks
The above Python program is quite self-explanatory, but I would like to emphasize a few of the sections which can be tedious to understand.
Program Structure:
- Program uses turtle and random modules from the python library
- a couple of function definitions with input parameters
- Data type List with multiple values or empty list to iterate within loops
- Nested for loops with two variables in the for loop statement instead of one
Intro
You can start by setting up the scene:
from turtle import *
import random

# Width and Height of Tree Object
n = 170
speed("fastest")
left(90)
forward(3*n)
You have just imported python libraries used to design Christmas trees and specified their width and height dimensions over the turtle canvas. We have defined length, angle, and how forward we want our graphics to be drawn. We have also defined the speed at which we want the turtle to draw graphics over the screen. We have set speed to fastest in order to save our waiting time while the python turtle is drawing on the screen.
You can read more about specification and submodule Move and Draw Turtle Python
Turtle screen setup
Next, create the turtle screen which will be the card body:
# Celebration Card setup
card=Screen()
card.setup(1.0,1.0,0,0)
card.title("Christmas Celebration!")
colors=['#92b6f0','#d95d78','#5cdbb5','#5ccde0','#e0d758','#ed9277']
card.bgcolor(random.choice(colors))
Now the fun starts. Our aim in this tutorial is to write tidy and efficient code that is readable. Notice how I set up the card size to full screen card.setup(1.0,1.0,0,0) Also let’s give a title to the card card.title("Christmas Celebration!") As you must have observed the card has a random background color. So for this, we will make a list of our favorite colors and choose a random color from the list
colors=['#92b6f0','#d95d78','#5cdbb5','#5ccde0','#e0d758','#ed9277']. These are some good ones but you can choose your favorite colors too. Now let’s set the background color using the choice function from the random module card.bgcolor(random.choice(colors)).
The card body is now ready. Let’s move to the next step.
Setting Tree properties
# Tree color
color("dark green")
# Draw backward desgin cordinates
backward(n*4.8)
# Turn turtle animation on/off and set delay for update drawings
tracer(8,50)
Here we are setting color for our Christmas tree, which is of course going to be Green in nature. As trees get drawn using skeleton structure we need to provide backward coordination to the turtle so it can draw leaves and branches over the tree. In the last, we are limiting the tracing of the turtle to the max so that it can draw graphics faster. Although, you can disable drawing and skip to main graphics by setting tracer(0,0) that way only final graphics can be visible I have kept here because I like to see how turtle draws over the screeen.
Drawing Santa Hat
# Drawing Santa Hat Function
def drawHat():
    pen.color('red')
    pen.fillcolor('red')
    pen.begin_fill()
    for i in range(3):
        pen.fd(50)
        pen.right(120)
    pen.end_fill()
    for i in range(6):
        pen.dot(10,'white')
        pen.fd(10)
    pen.right(130)
    pen.fd(55)
    pen.dot(10,'white')


# Calling Draw hat funtion
pen.setheading(1)
pen.fd(260)
pen.left(150)
pen.fd(40)
drawHat()
Firstly, we will position the pen where we want to draw the Santa hat-
pen.setheading(1)
pen.fd(260)
pen.left(150)
pen.fd(40)
Let's first understand the dimensions for the hat: The first line sets the pen to point straight. The second line moves the pen ahead by 260px in the horizontal direction. The third line sets the turtle to the left side of the screen with a distance of 150px. The fourth line moves the pen ahead by 40px in the horizontal direction. Now let’s define a function called draw() which will draw the Santa hat on turtle screen-
def draw drawHat():
    pen.color('red')
    pen.fillcolor('red')
    pen.begin_fill()
    for i in range(3):
        pen.fd(50)
        pen.right(120)
    pen.end_fill()
Here we are drawing a triangle filled with red color. The first line of function says that we are using red color. The second line tells Python to fill the shape with a ‘red’ color.
With pen.begin_fill(), the pen will start drawing the shape and filling it with the red color. For loop will draw a triangle. pen.end_fill() ends the color fill operation.
Also, let’s add 6 white-colored small pom-poms at the base of the hat using a for loop and add a big pom-pom at the top of the Santa hat
    for i in range(6):
        pen.dot(10,'white')
        pen.fd(10)

pen.right(130)
pen.fd(55)
pen.dot(10,'white')
Now that we have defined the function let’s call it to draw the Santa Hat using function definition.
drawHat()
Drawing a Christmas Tree
# Draw Christmas Tree
def tree(d, s):
    if d <= 0:
        return
    forward(s)
    tree(d-1, s*.8)
    right(120)
    tree(d-3, s*.5)
    right(120)
    tree(d-3, s*.5)
    right(120)
    backward(s)

tree(15, n)
backward(n/2)
Here we have defined the Positional argument python function, in which we are expecting distance and length parameters for our tree. if d is less than 0 we are aborting the function execution. If it is greater than zero then the turtle will move forward with the length defined.
We have used Turtle methods to construct a tree by using coordinates provided at their documentation. Learn here
Creating Snow and Snowflakes
# Draw Snow before Christmas Tree
def makeSnow():
    for i in range(50):
        snow=Turtle()
        snow.pu()
        snow.color("white")
        snow.shape("circle")
        snow.speed(0)
        snow.goto(random.randint(-700,700),random.randint(-700,700))
        snow.dot(7,'white')
        snowlist.append(snow)

# Snowfall after Christmas tree completion
def snowfall():
    for i in snowlist:
        i.goto(random.randint(-700,700),random.randint(-700,700))
        i.dot(7,'white')

# Calling make snow function
snowlist=[]
makeSnow()

card.tracer(False)
card.tracer(True)
while True:
    snowfall()
    card.bgcolor(random.choice(colors))
Let’s first add the following step card.tracer(False) This will hide the turtle trace so we will not see the steps of drawing each snow. Let’s now make an empty list to store snowflakes snowlist=[] Let’s create a function to draw the snow on the screen.
def makeSnow():
    for i in range(50):
        snow=turtle.Turtle()
        snow.pu()
        snow.color("white")
        snow.shape("circle")
        snow.speed(0)
        snow.goto(random.randint(-700,700),random.randint(-700,700))
        snow.dot(7,'white')
        snowlist.append(snow)
This function will create 50 white snow circles scattered across the screen. The first line of the function snow=turtle.Turtle() creates a new turtle object. The next three lines tell Python to put the pen up, set the color to white, and shape to a circle.
With speed(0) we are telling the python that the snow turtle will move at the fastest speed. With snow.goto(random.randint(-700,700),random.randint(-700,700)) we ask Python to move the snow turtle randomly. This will move the turtle inside a window ranging from 700px and 700px at a random position. We then tell python to put a dot at each of these random positions with white color using snow. dot(7,'white') function. The last line appends the created snow object to the list snow list. Now let’s call this function to draw all the snowflakes on our card.
makeSnow()
Draw Greetings
# Draw Merry Christmas heading
pen=Turtle()
pen.hideturtle()
pen.color("black")
pen.pu()
pen.setx(-500)
pen.color('Yellow')
pen.write("Merry\nChristmas!!",font=("phosphate",40,"italic"),align="left")
pen.setheading(-90)
pen.fd(100)
pen.write("TO ALL OF YOU",font=("phosphate",30,"bold"),align="left")
To write a greeting message we need a pen. So let’s first create another turtle object for pen pen=Turtle(). We will hide this turtle from the screen as we don’t want it to be visible while writing pen.hideturtle(). Now let’s set its color to black and move it to a position where we want to display the greeting message.
pen.color("black")
pen.pu()
pen.setx(-500)
So the pen is ready. Now let’s write the greeting message.
pen.write("Merry\nChristmas!!",font=("phosphate",40,"italic"),align="left")
pen.setheading(-90)
pen.fd(100)
pen.write("TO ALL OF YOU",font=("phosphate",30,"bold"),align="left")
The first line writes the texts “Merry” and “Christmas!” in separate lines. We use ‘\n’ to show line break. We used a font called “phosphate” of size 40 with italic style for the text. The second line sets the pen to point downward. The third line moves the pen ahead in the downward direction by 100px. The fourth line writes the text “TO ALL OF YOU” with a font called “Courier” of size 30 and makes it bold. And our greeting message is ready!
Ending
And you now almost have the Christmas tree ready. Above you have seen how to build this program, and create a trunk for the Christmas tree.
Try it out, and then you can add your own finishing touches. Let me know how it goes in the comments below!
Merry Christmas, and enjoy coding in Python during the Christmas holidays and for the next year.
Ciao ~!