
Automating AWS Cloudfront Cache invalidations in a CICD with AWS CLI - Jenkins pipeline - Shell Script

DevOps + SRE + Security + Python + Microservices + Service Mesh + Cross-Platform App Development(Flutter and Dart)
Certified Multi-Cloud DevOps Professional with 5 years of hands-on experience in automating and optimising mission-critical deployments over a large infrastructure. Proficient with IAC, CAC Tools like Terraform, Ansible, Consul, Linux, Kubernetes, and in developing CI/CD pipelines through Jenkins. Interested in Cross-Platform app development with Flutter and Dart Framework
Introduction
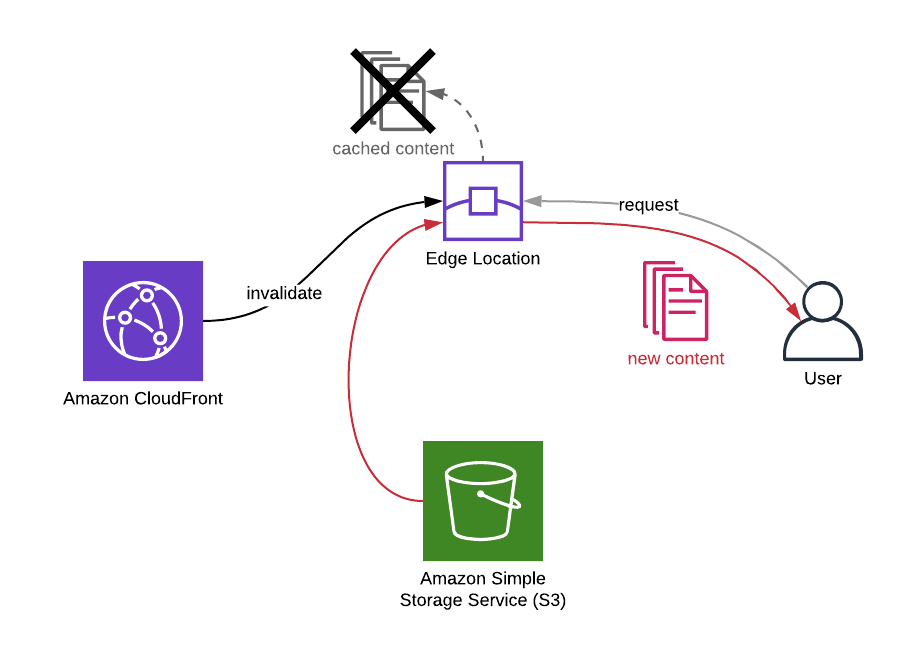
When you make changes on your content distributed via your Amazon CloudFront distribution, you have two options for them to be visible if they are cached: You will either wait for the cache to expire or you will invalidate them to serve the changes immediately. Of course, you cannot do anything about the cached content on your users’ browsers. But on your side, everything is under your control on AWS.
In this tutorial, I will talk about how to invalidate some paths on your Amazon CloudFront distributions using AWS CLI in Jenkins Pipelines along with some other commands that may be helpful in the process.
Why invalidate?
The main reason you use Amazon CloudFront is to cache your most viewed contents on the AWS edge locations near your users and deliver them faster by avoiding access to origin. You can set cache settings on CloudFront or origin.
When you update content, it may not be displayed immediately. Because you only updated its origin and your users may be receiving it from their closest edge locations. The requests may not be even routed to the origin until the cache expires. I use may here, because it is not certain, too. If your content was not accessed for a while, it may not be in the cache. But most probably it will be if it is one of the most viewed ones like your homepage.
The update may not be crucial for you. So you may choose to wait for the cache to expire. But what if it is content that needs to be available immediately. You can do this by invalidating the path of the content on your Amazon CloudFront distribution.
There are Two Ways to Invalidate Cache
Manual Way:
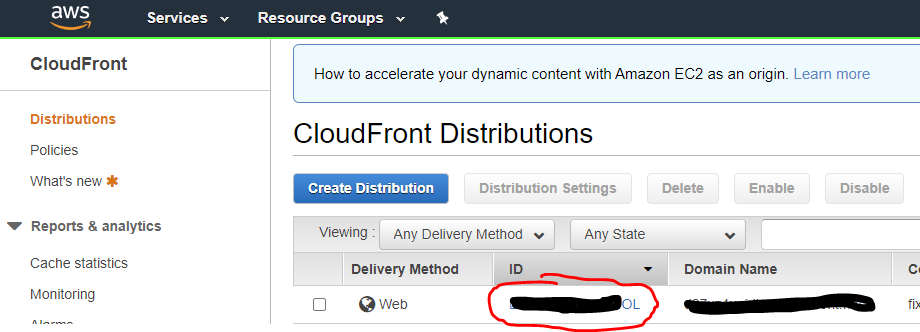
- Open your CloudFront Distributions list, and click the desired distribution ID (circled in red in the screenshot below) you want to clear its cache.
- Click the 'Invalidations' tab (see selected tab highlighted in blue in the screenshot below).
- Click the 'Create invalidation' button (circled in red in the screenshot below)
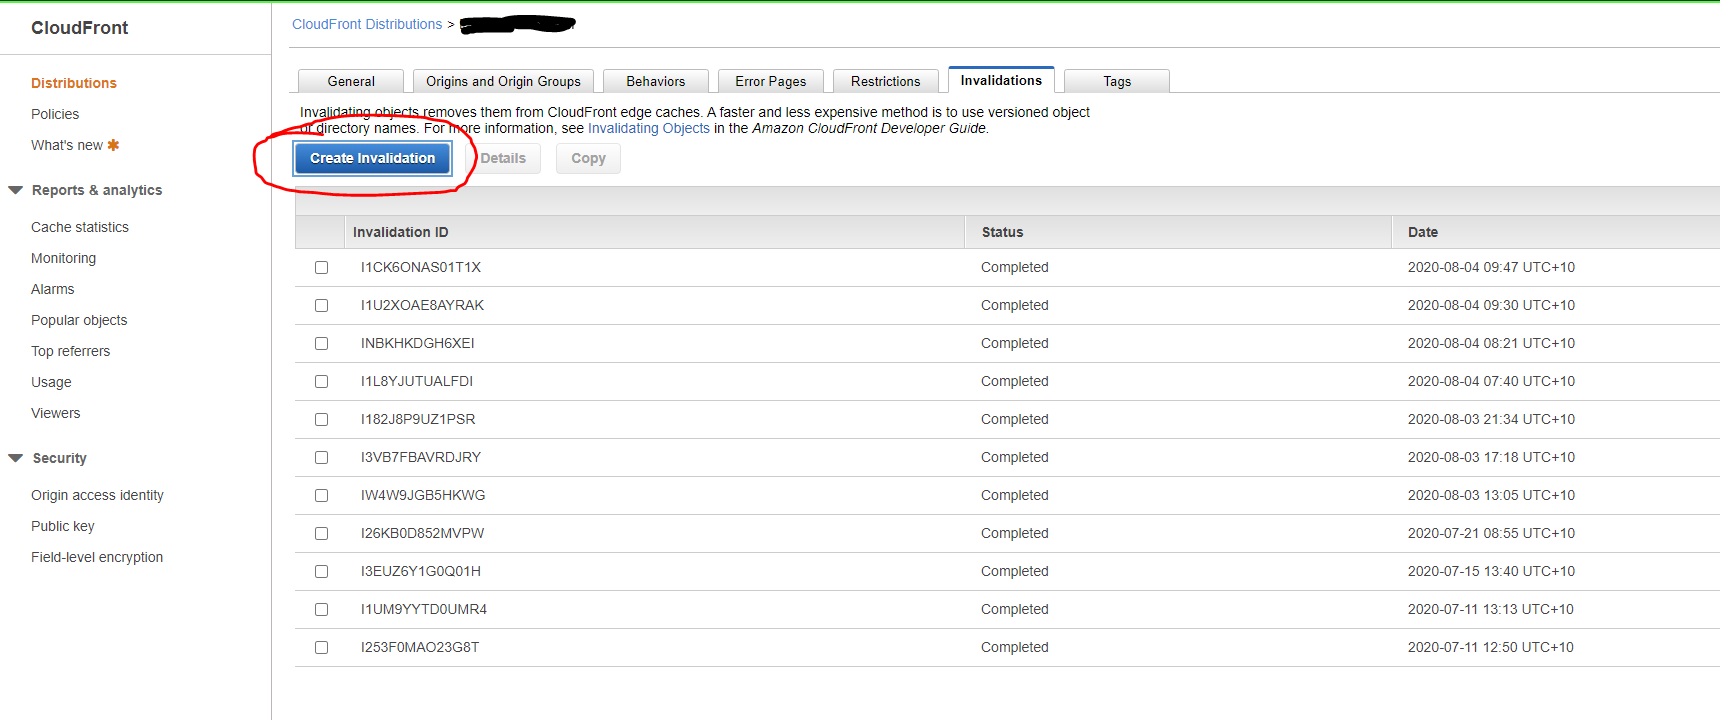
- Insert
/*in the object paths input in order to clear the cache of all files. - Click the 'Create invalidation' button.
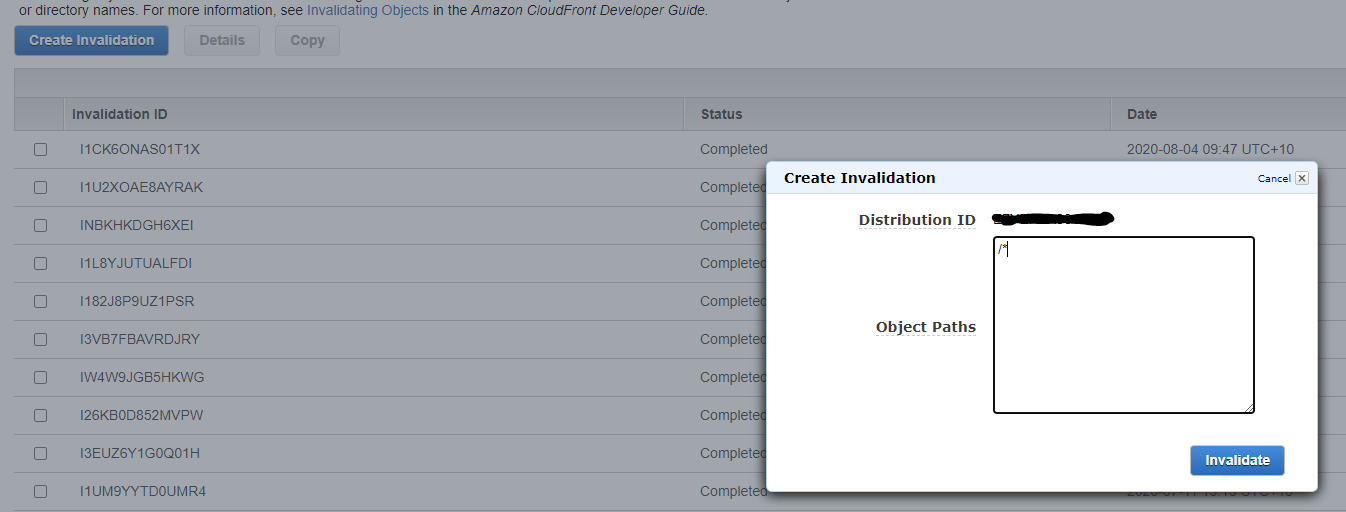
It's a temporary change and you don't need to delete it afterward. It runs immediately after you create it and clears the entire cache (if you use /*).
Automated Way:
- Automating with Shell Script using AWS CLI / Jenkins Pipeline
- Object Caching:
- Set Minimum TTL to 0:
- Set Maximum/Default TTL to whatever value you want (value is in seconds)
Why to Invalidate with AWS CLI?
AWS CLI is the command-line tool of AWS. When you get used to it, it is more convenient than using AWS Management Console. Instead of signing in and finding your resources, you simply type a few commands and it’s done. Besides, you can use the same commands to create bash scripts to make the process even easier and reuse the work done in the future.
AWS CLI can automatically invalidate your CloudFront CDN URLs when you upload a new version to an existing asset. No longer will you have to wait for its cache to expire. The assets you integrated externally using CloudFront will now always reflect the latest version
You can learn more about AWS CLI here
How to get AWS Cloudfront Distribution ID using AWS CLI
You will require the Distribution ID or Alternate Name of your CloudFront distribution. Should you get it from AWS Management Console? Yes, maybe… But you can list all your active CloudFront distributions using the list-distributions command as well.
$ aws cloudfront list-distributions
this command will return a large list if you have lots of distributions like me. So it will be feasible to filter it using the --query option.
To be able to write a correct --query filter, you need to know the format of the command response. Amazon CloudFront returns all responses in the format below. learn command here.
The above command returns lots of information, but we do not need most of them, right? Then let’s get only their Ids and Aliases. We can use Aliases to see the DNS names attached to each distribution, so we can distinguish the one we need to invalidate.
$ aws cloudfront list-distributions --query 'DistributionList.Items[*].{Id:Id,Aliases:Aliases.Items[*]}'
Now let’s explain the --query filter here. Firstly, as you see in the response format above, the command returns all distributions in the Items array of the DistributionList object. So we start with DistributionList.Items[*].[*] means all members of the array. Then we start filtering the attributes returned by using {} and separate them using commas.
In Id:Id or Aliases:Aliases.Items[*], the first string before: is the label you would like to see in the response. I usually keep them as they are. The string after: is how its value will be extracted from the response. Above we want Id and all the aliases of each distribution using [*]. Then the filtered response becomes similar to the one below.
    {
        "Id": "A1BANYRANDOMID",
        "Aliases": [
            "www.example1.com"
        ]
    },
    {
        "Id": "B1CANOTHERdJ6",
        "Aliases": [
            "example2.com"
        ]
    },
    {
        "Id": "E1FTHIRDJKLM7",
        "Aliases": [
            "example3.com"
        ]
    },
    ...
]
Let’s say that we would like to invalidate the distribution containing the alias example1.com. Then the Id of our distribution is A1BANYRANDOMID.
Invalidating the distribution using AWS CLI
In addition to the above, let’s say that we will invalidate paths /* or /index.html. These paths may have the same content, but for CloudFront they are different. Because it differentiates the contents by their paths.
We have two options to provide the paths we would like to invalidate. If we have only a few paths, we can provide them in the command line using the --paths option as below.
$ aws cloudfront create-invalidation --distribution-id="A1BANYRANDOMID" --paths /index.html /*
If we have lots of paths to invalidate, it may be feasible to provide them as a batch using a JSON file.
$ aws cloudfront create-invalidation \
> --distribution-id "A1BANYRANDOMID" \
> --invalidation-batch file://invalidations.json
The format of the invalidations in this file should be similar to the one below.
{
  "Paths": {
    "Quantity": 2,
    "Items": ["/index.html", "/"]
  },
  "CallerReference": "invalidation-2021-11-29"
}
If you provide the paths using the --invalidation-batch option, you need to provide CallerReference as well as the number of paths in Quantity. CallerReference is a custom reference for your invalidation. But if you provide the paths using the --paths option, it generates the CallerReference randomly and there is no need to provide Quantity.
Both calls return the invalidation information in the response like below.
{
    "Location": "https://cloudfront.amazonaws.com/2019-03-26/distribution/E1F235GHIJKLM7/invalidation/I3UQXMDE3XDWF6",
    "Invalidation": {
        "Id": "I3UQXMDE3XDWF6",
        "Status": "InProgress",
        "CreateTime": "2021-11-28T17:51:20.961Z",
        "InvalidationBatch": {
            "Paths": {
                "Quantity": 2,
                "Items": [
                    "/",
                    "/index.html"
                ]
            },
            "CallerReference": "cli-1574963480-396433"
        }
    }
}
The value of the CallerReference changes depending on the option you use. I used the --path option and it generated something like cli-1574963480-396433.
As you see, the Status is InProgress. The invalidation will take time to complete because it will clear all edge locations. We need to poll its status until it finishes from time to time. But no need to do this manually! Because there is a helpful wait command for this.
Polling the invalidation status until it completes via AWS CLI
We will use the CloudFront wait command for this. This command has a few sub-commands, but we will provide invalidation-completed as we will use it for checking the status of our invalidation. Then we will only need the IDs of the distribution and the invalidation we created.
$ aws cloudfront wait invalidation-completed \
> --distribution-id E1F235GHIJKLM7 --id I3UQXMDE3XDWF6
This command will poll the invalidation status every 20 secondsuntil it completes. If you enrolled in my AWS CloudFormation Step by Step: Beginner to Intermediate course and finished the Using AWS CLI to Manage Your Stacks section, you will see that it is similar to cloud formation wait for command in behavior.
When the invalidation status becomes Completed, this command will stop executing and return to our terminal. If this does not happen in 30 tries, it will return a code of 255. So it tries for roughly 10 minutes.
Retrieving the invalidation details
As a final check, you may want to retrieve the invalidation status by yourself and see it with your own eyes. Then you can use the get-invalidation command. Again you only need the Ids of your distribution and invalidation.
$ aws cloudfront get-invalidation --distribution-id E1F235GHIJKLM7 --id I3UQXMDE3XDWF6
{
    "Invalidation": {
        "Id": "I3UQXMDE3XDWF6",
        "Status": "Completed",
        "CreateTime": "2021-11-28T17:51:20.961Z",
        "InvalidationBatch": {
            "Paths": {
                "Quantity": 2,
                "Items": [
                    "/",
                    "/index.html"
                ]
            },
            "CallerReference": "cli-1574963480-396533"
        }
    }
}
Everything in a Shell Script for a Cronjob
#!/usr/bin/env bash

BUCKET=mysite.com
SOURCE_DIR=dist/

export AWS_ACCESS_KEY_ID=xxxxxxxxxxx
export AWS_SECRET_ACCESS_KEY=xxxxxxxxx
export AWS_DEFAULT_REGION=eu-west-1


echo "Building production"
if npm run build:prod ; then #whatever build command is, here using angular
   echo "Build Successful"
else
  echo "exiting.."
  exit 1
fi


echo "Removing all files on the bucket"
aws s3 rm s3://${BUCKET} --recursive


echo "Attempting to upload site .."
echo "Command:  aws s3  sync $SOURCE_DIR s3://$BUCKET/"
aws s3  sync ${SOURCE_DIR} s3://${BUCKET}/
echo "S3 Upload complete"

echo "Invalidating cloudfrond distribution to get fresh cache"
aws cloudfront create-invalidation --distribution-id=A1BANYRANDOMID --paths /* --profile=myawsprofile

echo "Deployment complete"
Everything in a Jenkins Pipeline to invalidate within CICD
The below pipeline will do the deployment of the angular-based application to the AWS Cloudfront and at the same will Invalidate the cache so that whenever a new requests visit our application URL new content can be cached at the edge location.
This is extremely helpful and keeps CICD flow, AWS CLI will fetch the alternate name of our CloudFront distribution and update its cache from the root directory therefore any changes in subsequent files will start reflecting. Jenkins Pipeline will make sure until cache invalidation gets completed Jenkins job status is pending, and once the distribution status is deployed, Jenkins job status gets changed to "success".
The pipeline script will keep polling the CloudFront service for the Invalidation status every other second until the status code changes to 255.
#!/usr/bin/env groovy
pipeline {
    agent any
    options {
        skipStagesAfterUnstable()
    }
    stages {
        stage('Build Application') {
            steps {
               //whatever build command is, here using angular
                sh 'ng build --aot --build-optimizer --optimization --project sample-web'
            }
        }
        stage('Publish Application') {
            steps {
                sh '''
                   set -x -v
                   account_id=$(aws ssm get-parameter --name session-param --with-decryption --region us-east-1 | jq -r .Parameter.Value)
                   role="arn:aws:iam::${account_id}:role/jenkins-sample-s3-permission-deploy-role"
                   aws sts assume-role --role-arn $role --role-session-name TemporarySessionKeys --output json
                   aws s3 cp "${WORKSPACE}/dist/" s3://simplewebapp.com/ --recursive --cache-control max-age=86400
                   CDN_ID=$(aws cloudfront list-distributions --query 'DistributionList.Items[?Aliases.Items[0]==`simplewebapp.com`].{Id:Id}' | jq -r '.[]| .Id' | cut -d\\" -f2)
                   INVALIDATION_ID=$(aws cloudfront create-invalidation --distribution-id $CDN_ID --paths "/*" | jq -r '.Invalidation.Id')
                   wait_for_invalidation() {
                     while [ $(aws cloudfront get-invalidation --id $INVALIDATION_ID --distribution-id $CDN_ID | jq -r '.Invalidation.Status') != "Completed" ]
                     do
                        aws cloudfront wait invalidation-completed --distribution-id $CDN_ID --id $INVALIDATION_ID
                     done
                        echo "Done Invalidation Cache";
                  }
               wait_for_invalidation
               aws cloudfront wait distribution-deployed --id $CDN_ID
               '''
            }
        }
    }
    post {
        always {
            mail to: 'support@support.com',
             subject: "Failed Pipeline: ${currentBuild.fullDisplayName}",
             body: "Something is wrong with ${env.BUILD_URL}"
        }
    }
}
Conclusion
After updating your content, you may need to invalidate them on edge locations on Amazon Cloudfront if you're using the manual option to serve the updates to your users as soon as possible. So in this post, we have shown how to achieve this using AWS CLI, Shell Script, and Jenkins Pipeline
If you need to do this regularly in every update, I recommend you to develop an AWS Lambda function which invalidates the paths you like on your distribution using AWS SDKs and integrate it into your CI/CD pipeline using AWS CodePipeline or Jenkins CI. Then you can trigger that function from your CodePipeline or Jenkins DSL as a final step.
We can demonstrate more such guides, so I recommend you to follow our blog not to miss it when it is published.
Thanks for reading!
References
Invalidating Files - CloudFront Documentation


